วันอังคารที่ 27 มีนาคม พ.ศ. 2555
วันจันทร์ที่ 26 มีนาคม พ.ศ. 2555
SAMSUNG WAVE723 S7233E ค่าวัดไฟเม็ดพาวเวอร์ วัดมาเผื่อ (จุดวัดไฟอะไรบ้าง ต้องไปดูเทียบเอาเองครับ)_files
SAMSUNG WAVE723 S7233E ค่าวัดไฟเม็ดพาวเวอร์ วัดมาเผื่อ (จุดวัดไฟอะไรบ้าง ต้องไปดูเทียบเอาเองครับ)


วันอาทิตย์ที่ 25 มีนาคม พ.ศ. 2555
Jailbreak iOS 4.3.3 with Redsn0w (Guide) มีวิธีแก้ปัญหาระหว่างการทำ
Jailbreak iOS 4.3.3 with Redsn0w (Guide) มีวิธีแก้ปัญหาที่น่าจะเกิด ระหว่างการทำด้วย
http://osxdaily.com/2011/05/06/jailbreak-ios-4-3-3-with-redsn0w/
http://www.limera1n.cc/2011/05/jailbreak-433-ios-untethered-sn0wbreeze.html
Jailbreak iOS 4.3.3 with Redsn0w (Guide)
 Jailbreaking iOS 4.3.3 is made easy with the redsn0w utility, if you’re not sure what to do then this guide will walk you through the process. The tutorial is geared towards the iPhone, but the steps would be the same for an iPod touch and iPad. This is an untethered jailbreak, meaning you can reboot freely without concern.
Requirements before starting:
That’s about it, happy jailbreaking!
http://osxdaily.com/2011/05/06/jailbreak-ios-4-3-3-with-redsn0w/
http://www.limera1n.cc/2011/05/jailbreak-433-ios-untethered-sn0wbreeze.html
Jailbreak iOS 4.3.3 with Redsn0w (Guide)
May 6, 2011 - 56 Comments
Jailbreaking iOS 4.3.3 is made easy with the redsn0w utility, if you’re not sure what to do then this guide will walk you through the process. The tutorial is geared towards the iPhone, but the steps would be the same for an iPod touch and iPad. This is an untethered jailbreak, meaning you can reboot freely without concern. Requirements before starting:
- Compatible hardware includes: iPhone 3GS, iPhone 4 GSM, iPad 1, iPod touch 3rd & 4th Gen
- You need the latest version of iTunes (10.2.2)
- Update your iPhone, iPad, iPod touch to iOS 4.3.3 before proceeding
- Download Redsn0w 0.9.6rc15 (Mac & Windows versions available)
- Download iOS 4.3.3 IPSW for your specific device
- About 10 minutes of your time
Jailbreaking iOS 4.3.3 with Redsn0w 0.9.6rc15
- Launch Redsn0w and browse for the iOS 4.3.3 IPSW firmware file you downloaded
- Read the onscreen instructions and click on “Next” and let redsn0w prepare the jailbreak
- Select “Install Cydia” and any other options you want enabled, and click on “Next”
- Now you need to turn off your iPhone and connect it to your computer, when this is finished click Next
- Follow the onscreen instructions to put your iPhone into DFU mode. They are: hold down Power button for 1 second, now continue to hold Power while holding Home button for 10 more seconds, now release Power but continue holding Home for another 15 seconds. When this is successful, the jailbreak will start automatically (You can read more about DFU mode here).
- You’ll see what looks like a console appear on the iPhone screen with gibberish scrolling by, this is normal and it indicates the jailbreak is installing. When finished, your iPhone (or iPod or iPad) will reboot automatically, and the device will be jailbroken
Troubleshooting Redsn0w
Running into problems? It can happen, but they’re usually easy to solve. Here are some common issues and their solutions:- Redsn0w Crashes in Windows – For Windows users who run into problems with redsn0w crashing, you need to set the CPU affinity to 1. Run redsn0w and then hit Control+ALT+DEL to bring up the task manager, select and right-click on Redsn0w.exe, go to “Set Affinity” and check the box next to CPU1. Now proceed as usual.
- Redsn0w won’t run in Windows – You need to run Redsn0w in XP Compatibility mode
- Error 3194 in iTunes – you need to temporarily edit your hosts file
- White Cydia Icon – temporarily perform a tethered boot with redsn0w, or re-add Cydia http://apt.saurik.com/cydia to Cydia sources
- I hate it, how do I remove the jailbreak? – Unjailbreaking is just a matter of restoring through iTunes, it is not a permanent modification.
That’s about it, happy jailbreaking!
วันเสาร์ที่ 24 มีนาคม พ.ศ. 2555
เวปรวมไฟล์ deb ของ ไอโฟน ใสผ่าน ifunbox เร็วดี
เวปรวมไฟล์ deb ของ ไอโฟน ใสผ่าน ifunbox เร็วดี + mobile subtrate
http://www.elunchen.com/p/cydia-packages-deb.html
http://www.elunchen.com/p/cydia-packages-deb.html
ลำดับไฟ เอกสารแสดง รายละเอียด ต่างๆ ของไอซีพาวเวอร์ BB 9700


อันนี้เงื่อนไขที่สภาวะต่างๆ ไอซีเม็ดไหน เรียกร้อง ไฟอะไรจากไอซีเม็ดไหน มีเงื่อนไขอะไรบ้าง

ค่าไฟเลี้ยงรองต่างๆ ที่ควรจะเป็น

ซ่อมgalaxy P1000 How To Setup ADB (Android Debug Bridge) On Windows
ซ่อมgalaxy P1000 How To Setup ADB (Android Debug Bridge) On Windows
http://www.dkszone.net/setup-install-adb-android-debug-bridge-windows-7
http://www.oracle.com/technetwork/java/javase/overview/index.html
http://www.oracle.com/technetwork/java/javase/downloads/index.html
http://developer.android.com/sdk/index.html
There are many useful apps in Android market using which you can do more things. But many of these popular apps need root access to your android phone. Root access is restricted by manufacturer due to security reasons, hence you need to root android.Before rooting Android devices one should install and setup ADB (Android Debug Bridge) on your PC. We show you procedure for Samsung Galaxy S (GT I9000) android phone, although it should work for other Android devices too.
Here is a step-by-step guide on how to setup ADB on your Windows 7 PC and debug your Android device.
1. Download and install Java SE Software Development Kit (SDK). Make sure you download the package by clicking on first icon named Java Platform (JDK).
 2. Download Android Software Development Kit (SDK) depending upon your OS and extract the zip content to your desktop.
3. Open the folder and then double-click on “SDK Manager”. From the packages to install list double-click on “USB Driver package, revision..”. You can choose to deselect all items except USB Package if you have slower internet download speed. Click “Install” and wait for the installation to finish.

4. On your Android device (Samsung Galaxy S in our case), go to:
Applications –> Settings –>Applications—> Development
Turn ON “USB debugging” mode.

5. Connect the android phone to PC by using the USB connection.
6. Windows will start recognizing the device. You will then see a message “Device driver software was not successfully installed”. Clicking on the message will lead to another popup that says “SAMSUNG_Android” driver was not found. The message varies depending the Android model and brand. Ignore the message and click “Close”.
Instead if you see “Device installed successfully”, jump to STEP:15!


7. Click “Start” –> right-click on “Computer”—> “Manage” (You need to have admin rights to do this on your PC).
8. Expand the tree in left pane by clicking on System Tools –> Device Manager.
9. In the right pane, expand “Other devices”. You will see a yellow exclamatory mark on the device icon. Right-click on it and select “Properties”.

10. In the following window, click on “Update Driver” button.

12. Select “Browse my computer for driver software” and then select “Let me pick from list of device drivers on my computer”.
13. Click “Next”—>“Have disk”, browse through and select “android_winusb” item as shown below.

14. Click “Next”. Windows will confirm whether to update drivers. Go ahead and click “Yes”.


15. Windows should successfully finish the driver software for your android phone.

You are done with ADB installation. To verify, connect android device to your computer and then “Start”—> right-click on “Computer”—> Manage.
In the left pane, click on “System Tools”—> “Device Manager”.
In the right pane, expand “ADB Interface”. Your device will be listed. In our case, it is shown as “SAMSUNG Android Composite ADB Interface”. In most cases, it shows “Android ADB Interface” which implies successful ADB setup.

-OR-

วันศุกร์ที่ 23 มีนาคม พ.ศ. 2555


วันจันทร์ที่ 19 มีนาคม พ.ศ. 2555
วิธีการซ่อม I-PHONE4 ปลายสายคู่สนทนาไม่ได้ยินเสียงเรา
ติดต่อซ่อมที่
http://iphoneblackberry-repairshop.blogspot.com/2012/05/blog-post.html
084-672-6028 ร้านตั้มมือถือ
อ่านเพิ่มเติม + รูปขณะซ่อมจริง
http://iphoneblackberry-repairshop.blogspot.com/2013/02/iphone4.html
วันพฤหัสบดีที่ 15 มีนาคม พ.ศ. 2555
คู่มือซัมซุง กาแล็คซี่แท็บ ภาษาไทย — Presentation Transcript
คู่มือซัมซุง กาแล็คซี่แท็บ ภาษาไทย — Presentation Transcript
ขอชอบคุณบทความจาก http://www.slideshare.net/sompriaw/ss-11424479 โดย
duangdee
คู่มือซัมซุง กาแล็คซี่แท็บ ภาษาไทย — Presentation Transcript
- 1. เนอหาบางสวนในคมอนอาจแตกตางไปจากทปรากฏในโทรศพทของคณ ขนอยกบซอฟทแวรของโทรศพทหรอผใู้ หบรการโทรศพทมอถอของคณ ้ื ่ ู่ ื ้ี ่ ่ี ั ์ ุ ้ึ ู่ ั ์ ์ ั ์ ื ้ ิ ั ์ื ื ุ การติดตั้ง Kies (PC ซิงค์) 1. คุณสามารถดาวน์โหลด Kies เวอร์ชั่นล่าสุดได้จาก เว็บไซต์ซัมซุง (www.samsungmobile.com) และติดตั้งลงใน PC ของคุณ 2. ในโหมดเมนู ให้เลือก การตั้งค่า → การเชื่อมต่อไร้สายและเครือข่าย → การตั้งด่า USB → Samsung Kies 3. สำหรับการใช้สายเชื่อมต่อข้อมูลกับ PC และการเชื่อมต่อโทรศัพท์ของคุณเข้ากับ PC โปรดดูที่วิธีใช้ Kies สำหรับ
วันพุธที่ 14 มีนาคม พ.ศ. 2555
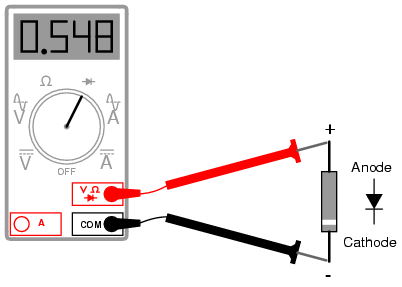
รวมเทคนิคการใช้งานมิเตอร์แบบเข็ม ซ่อมโนเกีย เป็นพื้นฐานของการเรียนรู้
รวมเทคนิคมัลติมิเตอร์แบบเข็ม
http://www.inventor.in.th/2012/2011-07-06-15-43-20/7-2011-07-03-05-53-51/70-2011-09-15-14-53-52.html

ก้อปปี้มาจากลิ้งค์เวป ข้างบน และข้างล่าง ขอขอบคุณ admin เจ้าของบทความไว้ ณ ที่นี้ครับ
การตรวจสอบไดโอด
https://wiki.stjohn.ac.th/groups/poly_electronics/wiki/6cd66/
http://forum.gsmhosting.com/vbb/f148/my-nokia-hardware-repairing-technics-560588/

วันอังคารที่ 13 มีนาคม พ.ศ. 2555
ปลดล้อกเครื่องนอก เครื่องหิ้ว LG และยี่ห้ออื่นๆ
งานนี้ปลด lg ต้องการ NCK CODE มาใส่เครื่องเพื่อปลดล็อก
เราใช้โปรแกรมคำนวณ เร้วกว่าถูกกว่าการซื้อโค้ดจากฝรั่ง ซึ่งไม่รู้ว่าโอนเงินไปเมืองนอกแล้วจะได้ดค้ดกลับมารึป่าว

เราใช้โปรแกรมคำนวณ เร้วกว่าถูกกว่าการซื้อโค้ดจากฝรั่ง ซึ่งไม่รู้ว่าโอนเงินไปเมืองนอกแล้วจะได้ดค้ดกลับมารึป่าว

วันพฤหัสบดีที่ 1 มีนาคม พ.ศ. 2555
วีธีการเติมแต่งสีสัน ให้บล็อกของเรา
Blogger Build สร้างบล็อก เขียนบล็อก ด้วย Blogger
http://bloggerbuild.blogspot.com/
ขอบคุณที่มาของบทความ ครับ
สมัครสมาชิก:
บทความ (Atom)